What is a bujo?
It’s a bullet journal, where you organize your ideas in a bullet list. It’s an analog way to organize your ideas, says Ryder Carroll, who, ironically, is a digital designer.
Anyway,
I was looking for planners and fell in love with Erin Condren’s. But my goodness! Personalizing stuff or bespoking is expensive. I was about to check out my cart and found the price to be quite unreachable at the moment. So that’s that. But I still read her FB posts and I found this link to a blog about personalizing your journal. One link led to another, and so I started pinning some ideas on my procastination Pinterest board.
I was overwhelmed with the choices, so I needed to find out how do I start my #bujo?
You just need a pen, a ruler, and a blank journal. The beauty of it is you get to choose which size you’re comfortable with and whether you want lined, blank, or dotted. Since the only blank notebook I had was lined, I’ll have to make do with that and just wait for it to be filled with some semblance of organized ideas.
At first, I felt apprehensive on how to start it. You know how it is. Too many questions.
Is this right? How do I start? Am I making sense?
Turns out, you have to at least start in order to get an idea on how you can personalize your journal. Make room for errors, especially if you’re a straight-to-pen person, just like me. Believe me, so many mistakes on my first try. I think when you get the hang of it, then using it will be second nature to you.
I started with a legend or key page. I kept it simple so I could remember the bullets. Maybe just add more when I am well-versed with these.

The index is similar to a table of contents page of a book. However, you fill this in as you progress with your bullet journal. Pagination begins after the index page.
The future log is just a fancy name for the whole year calendar. Since I don’t have a dotted notebook, it would be unwise to create a calendar from scratch. Instead, I divided my two-page spread into 6 boxes to create a 6-month overview, since we are halfway through the year. Labeled each box beginning with this month until December. I placed birthdays and known holidays/events here for future trip planning.

The monthly log has the whole month on the left side page and the monthly tasks on the right side page. On the left, write the dates and the initial letter of the day. You can write your birthdays, deadlines, or bill cycles here. On the right side is just a bullet list of tasks you wish to accomplish for this month.


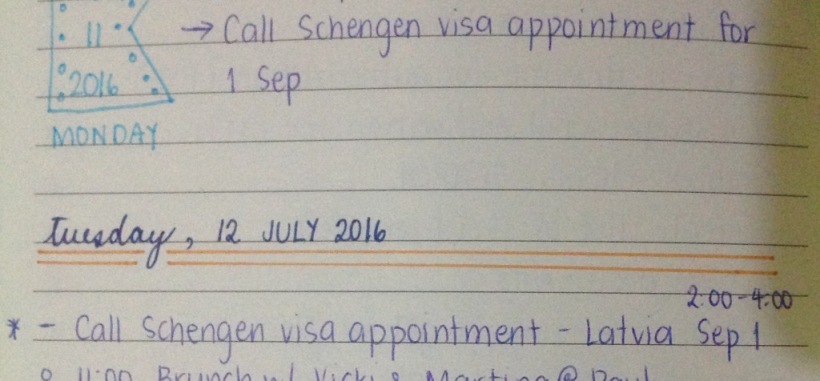
Then, you can move on to your daily log. As seen on Pinterest, people decorate this area to the nines! However, Ryder’s example is simple. He just used the date as the header and then wrote his daily tasks based on the monthly tasks. He only writes a new header when he is done for the day. Personally, since I am still trying this journal out I have started doing just that, but sampling some date headers as I go along everyday.

You can see the arrow bullet in my previous entry. That task was moved the next day. It has an *, which also means important. The arrow simply means that the task has migrated or moved to whenever you have it rescheduled.
I’m on holidays now, so we’ll see how I keep up with this bullet journal journey. I think it will be more useful when I go back to work or plan a new trip somewhere.
How do you keep organized?
Happy travels!